In this post I’ll show how to create a custom segue that animates an image to a new full screen view controller when tapped. This effect is similar to what you see when the Facebook iOS app makes a photo fullscreen.
Segues make it easy to abstract view controller transitions into reusable objects. Instead of having all the animation logic in your view controller the segue is now responsible for that. The view controller its role is reduced to configuring the segue and view controllers involved in the transition.
When done right this usually results in cleaner and more reusable code.

JKImageTransitionSegue
The custom image transition segue will animate an image from its current position to a new position in a new controller. To see what this looks like try running the source code or watch it on YouTube.
To use a custom segue, create it in your storyboard like any other segue. Set it’s type to Custom and it’s class to your custom subclass next. Optionally set an identifier.

The segue takes care of the actual animation in the - perform; method. Instead of moving the original UIImageView from one view controller to the other, a temporary UIImageView is used to fake the effect. This temporary UIImageView is added to the application window itself to stay on top of all other content. At the same time it will show the destination view controller using an ordinary modal transition, that will occur in sync with and underneath the custom image animation.
The original image is hidden as soon as the transition starts and the destination image is shown as soon as the transition ends. All together this looks like one image smoothly transitioning to another controller.
Configuration
To keep this as reusable as possible a custom segue shouldn’t need to know anything about it’s source and destination view controllers. Instead the segue can be configured before execution using - prepareForSegue:sender: in the originating controller.
The image transition uses this place to set three properties:
sourceRect- The original image rectangledestRect- The destination image rectangletransitionImage- The image to animate fromsourceRecttodestRect
These properties determine what the animation looks like without the segue having to know where to get that data from.
Unwinding custom segues
As of iOS 6 it’s also possible to unwind back to an earlier controller in your navigation path using a segue. Controllers you want to unwind to need an unwind action declared:
1 2 | |
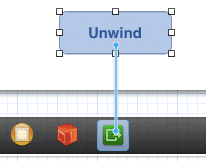
Next ctrl-drag from your control to exit button and to connect to one of the available actions. You’ll find the exit button as a green icon for each controller in your storyboard.

For the default push and modal segues this will use the same animation but reversed. For a custom segue no automatic reverse is provided so one of the default transitions will be used. It is also not possible to specify a custom class for an unwind segue in your storyboard.
To provide a custom segue for an unwind action you need to implement - segueForUnwindingToViewController:fromViewController:identifier: in the view controller you are unwinding to. This can be the same custom segue, or a different implementation depending on your needs.
For JKImageTransitionSegue this is also the place where the segue is provided with the right configuration, similar to prepareForSegue:sender:. In addition a custom unwinding property is used to let the segue know it should perform a reverse animation.
Demo app and source
I’ve set up a bitbucket repo to show this all in a working example.
Hopefully you’ll find this transition useful for your own app, or for inspiration when building your own transition. Some other interesting open source transitions available online:
- GC3DFlipTransitionStyleSegue - an iBooks style book case flip
- MPFoldTransition - folding and page flipping transitions
- DoorwaySegue - Doorway transition like the iPad movies app
For feedback I’m available as @kluivers on twitter.