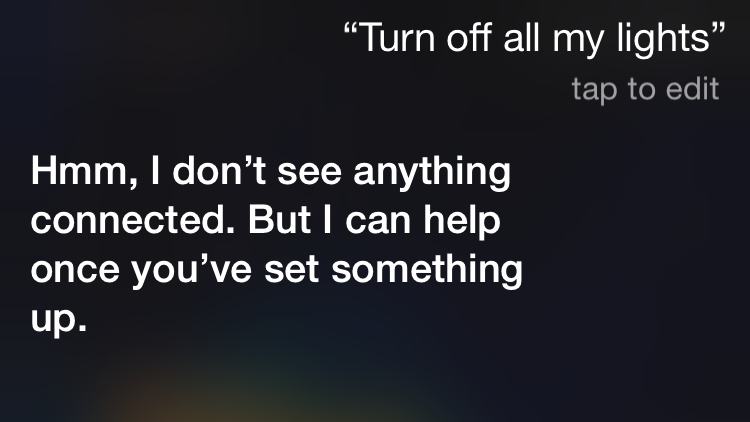
<![CDATA[Joris Kluivers]]>2016-03-07T20:37:00+01:00https://joris.kluivers.nl/Octopress<![CDATA[HomeKit]]>2015-01-07T14:47:00+01:00https://joris.kluivers.nl/blog/2015/01/07/homekitAt WWDC last summer Apple introduced HomeKit, the iOS 8 framework to communicate with connected devices in your home. Unfortunately half a year later asking Siri to turn off my lights doesn’t have the desired effect yet.
So far there is no actual hardware available with HomeKit support. However this is about to change quickly.
Upcoming hardware
Just this week a number of products with support for HomeKit have been announced already. These include:
It’s likely more announcements will be published because of the ongoing CES conference in Las Vegas. (I’ll make sure to keep the above list up to date).
Personally I’m still eagerly awaiting Philips Hue to adopt HomeKit.
DIY
Can’t wait for official hardware support for HomeKit? There are several efforts to bring HomeKit to any (programmable) hardware. These projects implement a HomeKit accessory bridge by reverse engineering the HomeKit accessory protocol that works over Wifi and Bluetooth LE. Use at your own risk.
Hap-NodeJS - a homekit accessory server implemented in Node.js
HomeKitBridge - hook up existing devices to HomeKit from your Mac.
]]><![CDATA[Tracking AppleScript progress in Yosemite]]>2014-10-31T15:36:00+01:00https://joris.kluivers.nl/blog/2014/10/31/yosemite-scripting-progress-reportingThe Yosemity update for OS X brings several advances in OS automation. A few people have written about this already, and as usual Michael Tsai provides a nice overview.
New in AppleScript is the ability to report progress. This enables the Finder or other UI in Yosemity to show progress indicators while your script is running.
12345678
set n to 10

set progress total steps to n

repeat with i from 1 to n
  delay 1
  set progress completed steps to i
end repeat
Script editor will run this script and show it’s progress at the same time:
Reporting progress in AppleScript looks very similar in usage to the NSProgress class introduced in iOS 7 and OS X 10.9.
The NSProgress class provides a self-contained mechanism for progress reporting. It makes it easy for code that does work to report the progress of that work, and for user interface code to observe that progress for presentation to the user.
Not only does NSProgress provide a way to transparently handle progress within the same process, it also works between processes. I’ve used this before in a simple command line utility to report it’s progress to any UI wrapped around it.
A small demo app I wrote proves AppleScript is using NSProgress as well, making it very easy to observe AppleScript progress in your own software. Even when that script is executed outside of your sandbox using NSUserScriptTask.
It doesn’t require a lot of additional code to get this working:
123456789
[NSProgressaddSubscriberForFileURL:scriptURLwithPublishingHandler:^NSProgressUnpublishingHandler(NSProgress*progress){self.progress=progress;// in the demo app the fractionCompleted property of the progress instance is observed by a progress bar using bindingsreturnnil;}];// run your script using NSUserScriptTask for example
It’s good to see NSProgress being adopted in different parts of the OS. However because the class is still relatively unknown it is not always clear where it’s functionality is available.
]]><![CDATA[Findings UI design iterations]]>2014-05-29T12:02:00+02:00https://joris.kluivers.nl/blog/2014/05/29/findings-designLast week Findings was launched, it is a new app to manage your experiments in the lab. I’ve been working on this together with Charles Parnot for the past 1.5 years and I’m very happy the Mac version is finally available. The iOS version is still in development and will be available later this year.
On his weblog Charles writes about the Making of Findings. The original mockups are dated 5 years ago already and it’s interesting to see how the interface evolved over the years.
]]><![CDATA[LLVM unrecognized command line options]]>2014-05-08T12:19:00+02:00https://joris.kluivers.nl/blog/2014/05/08/unrecognized-command-line-options-in-clangThe LLVM compiler in Xcode 5.1 now treats unrecognized compiler options as errors by default. Building Python or Ruby modules using unrecognized flags will now cause the build to fail.
I ran into this when trying to build lxml for Python recently. This failed with the following error message:
clang: error: unknown argument: '-mno-fused-madd'
Google or stackoverflow provided no answer to this problem.
As long as the build configurations are not updated an up-to-date OS X system will currently fail to build modules like lxml for Python.
The Apple LLVM compiler in Xcode 5.1 treats unrecognized command-line options as errors.
[..]
To workaround this issue, set the ARCHFLAGS environment variable to downgrade the error to a warning.
Use the following to successfully build lxml on Mavericks with LLVM/Xcode 5.1:
]]><![CDATA[The builder pattern in Objective-C Foundation]]>2014-04-08T21:18:00+02:00https://joris.kluivers.nl/blog/2014/04/08/the-builder-pattern-in-objective-c-foundationIn a recent blog post Klaas Pieter Annema wrote about using the builder pattern in Objective-C. Inspired by his post I created two categories that bring similar functionality to NSURL and NSDate.
Originating from Java the builder pattern is used to create new objects using a dedicated ‘builder’ object, instead of having every parameter in the constructor.
This pattern actually also currently exists in Objective-C Foundation. NSDate has NSDateComponents and as I recently wrote iOS 7 / Mavericks added NSURLComponents to complement NSURL. Both dates and URLs are immutable objects in Foundation with only simple initializers. To have more control over their creation you use their builder objects.
Klaas Pieter actually expands on the builder pattern and shows a very elegant way of using builders in Objective-C initializers using blocks. Illustrated using his pizza example:
Perfect for application on the existing builder objects in Foundation in my opinion.
]]><![CDATA[Generating constants for storyboard identifiers]]>2014-02-10T23:20:00+01:00https://joris.kluivers.nl/blog/2014/02/10/storyboard-identifier-constantsAfter I mistyped yet another segue identifier string this week my application once again suffered from a familiar crash:
Receiver (<JBWMasterViewController: 0x8cbd540>) has no segue with identifier 'showDetial'
You have probably seen a similar crash yourself, caused by a call to -[UIViewController performSegueWithIdentifier:sender:] with an unknown identifier. To prevent having hard-coded strings repeated all over the place I was already using constants to refer to my identifiers. However maintaining these constants manually is still prone to errors such as small typo’s. As demonstrated by my crash mentioned above.
To finally rule out crashes like this from now on my projects use a small python script to generate NSString constants for all identifiers found in UIStoryboard files.
Example usage
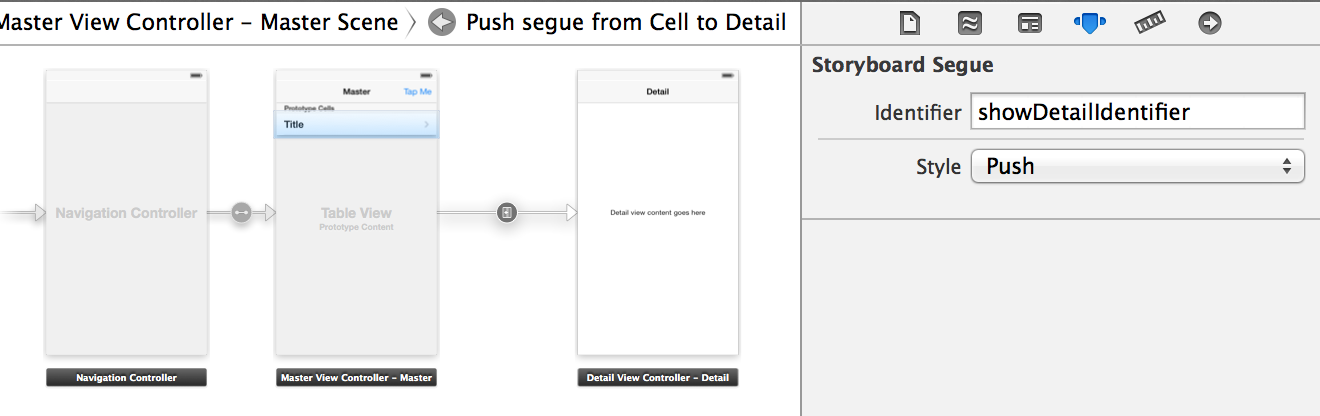
An example project is available on github that shows the script in action. The projects storyboard has two controllers and a single segue connecting them. Both controllers and the segue have an identifier set in the inspector.
This results in the following constants being generated:
The identifier prefix is customizable of course. Import the header file when needed and you’re good to go. Each time you modify a storyboard file your identifier constants will be generated automatically, providing you with:
compile time checks for any storyboard identifier
code completion (no need to remember the actual identifier)
Project setup
To make this work the python script is setup as a Run script build phase for the main project target.
The python file itself is stored in a Scripts directory. The generated files are placed in a generated directory next to the regular source files. I also commit the generated files to git.
Paths for the storyboard files and generated code are specified as input and output files for the build phase. This enables Xcode to figure out dependencies and will run the script only when the storyboard files have actually changed.
For a regular project generated from an Xcode template my projects use the following directory layout.
The script will work with different directory layouts, just make sure you modify the paths used in the build phase.
]]><![CDATA[Model identifiers]]>2013-11-28T22:21:00+01:00https://joris.kluivers.nl/blog/2013/11/28/model-identifiersSome statistics data I recently worked with included model identifiers for Apple devices. These identifiers are strings like iPad2,1 or MacBookPro10,2 and indicate what device variant and generation the software was used on.
The raw identifier is not something you usually display in a user interface directly, instead you show a more friendlier name. Unfortunately a way to translate iPad2,1 to iPad 2 (Wifi) is not readily available.
Note: An older identifier may refer to multiple models from different years or with different characteristics. In this case the Generation or Variant key is not unique and is usually left out. Somewhere around 2010 this practise changed and each identifier is unique for a specific device generation and variant.
Obtain a model identifier
To include the model identifier in your own statistics or client user-agent you can find it using the command line:
$ sysctl -n hw.model
Or to get a device model identifier using code, on Mac OS X or iOS use:
]]><![CDATA[NSURLComponents]]>2013-10-17T11:45:00+02:00https://joris.kluivers.nl/blog/2013/10/17/nsurlcomponentsAlong with the new URL loading classes (NSURLSession & family) iOS 7 and Mavericks also bring a new way of constructing URLs. Similar to what NSDateComponents provides for a NSDate we can now use NSURLComponents to inspect, build and modify NSURLs.
A NSURL object is only returned if the combination of set properties on NSURLComponents result in a valid URL, nil will be returned otherwise.
Use initWithURL:resolveAgainstBaseURL: or initWithString: to create a components object with an initial set of values.
I would have linked above API to the official documentation, unfortunately like with many other recently introduced functionality nothing is available online yet. The only reference to NSURLComponents is it’s public definition in NSURL.h in the relevant SDKs. So I’ve published the relevant NSURLComponents declaration as a gist for easy online access.
Out of all the newly introduced API’s on both Mac and iOS this class will probably be the one I use most.
Feedback
Any feedback is welcome. I’m @kluivers on twitter.
For more posts about new iOS 7 & Mavericks additions see also:
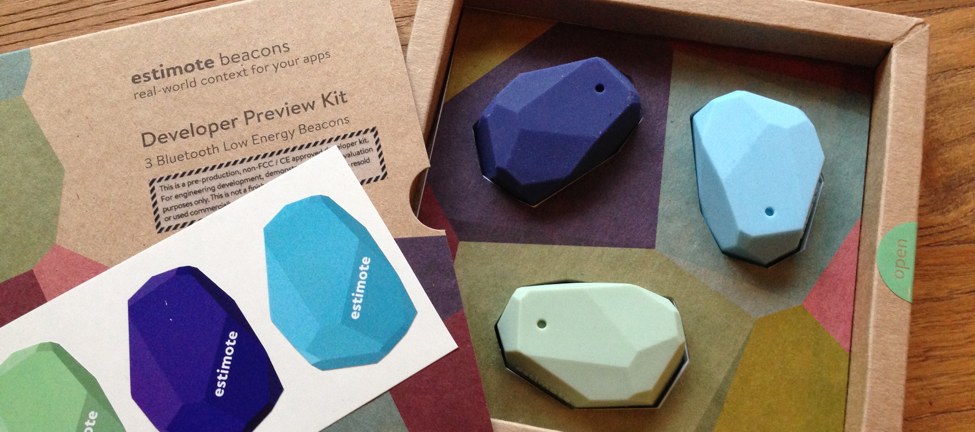
]]><![CDATA[Playing with iBeacon and Estimote in iOS 7]]>2013-09-27T17:15:00+02:00https://joris.kluivers.nl/blog/2013/09/27/playing-with-ibeaconMy Estimote Developer Preview kit arrived this week. The kit contains 3 small devices that broadcast a signal over Bluetooth LE, to be used for proximity detection. Most interesting is that the devices are compatible with iBeacon, the new microlocation & proxity feature in iOS 7.
Unboxing
The developer kit contains 3 soft rubber shell devices, each in a different color. The bottom side has some kind of adhesive material applied so the beacon can be attached to a flat surface. There’s no on/off button. The device is broadcasting all the time, even before getting out of its packaging. On a single battery (included) it should be able to survive up to two years.
Not imporatant but worth a mention: for a developer kit the packaging is quite nice and well designed.
On the inside the beacon contains a 32-bit ARM Cortex M0 CPU. This is the brain that coordinates between the onboard sensors and operates the Bluetooth LE profile.
Using a Bluetooth LE scanner like LightBlue or BLExplr you’ll be able to find each device. The apps will discover several LE services, presumably used to access its sensor data (accellerometer) or to flash the firmware over the air.
In addition to the published Bluetooth LE services each device conforms to the iBeacon specification. An iBeacon publishes certain information in its advertising packet that makes it possible to tie in to the new CoreLocation functionality in iOS 7. Because all information is contained in the advertising packet it’s not needed to actually connect to the device in your software. If you are mainly interested in iBeacon you can ignore the services published by the device.
Discovering the estimotes with iBeacon
iBeacon is part of the CoreLocation framework in iOS. Using a beacon is similar to geofencing. But instead of using a gps coordinate you are basing your proximity on receiving a Bluetooth LE signal. This makes it possible to detect proximity of moving targets by placing a beacon on them, instead of having to rely on a fixed gps location.
Each beacon has three identifiers:
proximityUUID: a unique UUID to distinguish your beacons from those others are using.
major: used to group related sets of beacons
minor: used to identify a beacon within a group
The major and minor numbers are basically arbitrary numbers and your app will have to give those a meaning using tie-ins to your product or shop database for example.
Currently on the Estimote the identifiers are specified by the manufacturer. However I have been promised functionality to customize these properties using an upcoming version of the Estimote app.
Developers take note, if you want to scan for your Estimote beacons use the following UUID. It’s currently not available in any of the documentation.
The UUID for an estimote beacon is:
B9407F30-F5F8-466E-AFF9-25556B57FE6D
One wish I have is to also be able to customize this UUID in the future.
As soon as you enter a region you’ll receive a notification via the CLLocationManagerDelegate mechanism. Next thing you can do is start monitoring for individual beacons in that range.
1234567891011121314151617181920212223242526
-(void)locationManager:(CLLocationManager*)managerdidStartMonitoringForRegion:(CLRegion*)region{[self.locationManagerrequestStateForRegion:self.region];}-(void)locationManager:(CLLocationManager*)managerdidDetermineState:(CLRegionState)stateforRegion:(CLRegion*)region{switch(state){caseCLRegionStateInside:[self.locationManagerstartRangingBeaconsInRegion:self.region];break;caseCLRegionStateOutside:caseCLRegionStateUnknown:default:// stop ranging beacons, etcNSLog(@"Region unknown");}}-(void)locationManager:(CLLocationManager*)managerdidRangeBeacons:(NSArray*)beaconsinRegion:(CLBeaconRegion*)region{if([beaconscount]>0){// Handle your found beacons here}}
You can also use the AirLocate WWDC sample code published by Apple to scan for the devices. Just make sure you update the UUID with the one provided above.
Advantages of iBeacon
Technically proximity detection of Bluetooth LE devices is perfectly possible without iBeacon. You can find the signal strength by just scanning for any advertising packet using the CoreBluetooth framework. I already demonstrated this in my UIKonf talk last april, when iBeacon was not even announced yet.
So why would you want to use iBeacon instead of making your own proximity detection on top of CoreBluetooth? The iBeacon functionality offers certain advantages:
Allows you to receive state notifications for ranges in the background using the location background mode.
Feedback
Let me know your opinion on iBeacon or what you would use it for. I’m @kluivers on twitter.
]]><![CDATA[My current side projects]]>2013-08-21T19:00:00+02:00https://joris.kluivers.nl/blog/2013/08/21/sideprojectsLike many developers I like working on my own side projects next to my usual daily activities. This gives me some distraction and also the opportunity to use new technologies I would’t use normally.
However the number of projects I started and never finished is growing. Sometimes I get bored with a project or even forget about it and just start something new. Inspired by Matt Swanson I decided to publish the list of my current projects.
Focus is a matter of deciding what things you’re not going to do.
- John Carmack
By keeping track of my projects here I hope to shorten the list eventually. Preferably by launching a finished version to the public, or to cancel the project all together. This also means I’ll try not to start new projects anymore and instead focus on any of the existing projects.
Shapefitter
What started as a weekend project to render vectors from custom shape files eventually turned into a Mac application to generate PNG artwork for apps and web. The general mechanics of the app are finished and I use the app regularly myself. But too many details required for a release version are still missing.
Teaser Website
qc-mobile
My Quartz Composer implementation for iOS. An ongoing effort to implement more Quartz Composer functionality & patches.
github.com / qc-mobile
A game
I’ve been playing with the thought of releasing a game for iOS. I’ve got several ideas ranging from very simple to kind of complex. The idea is to release the most simple game first to gain some experience using the frameworks involved and build on that experience to create the complex game. Especially now that iOS 7 will introduce SpriteKit for 2d games this idea got more enticing.
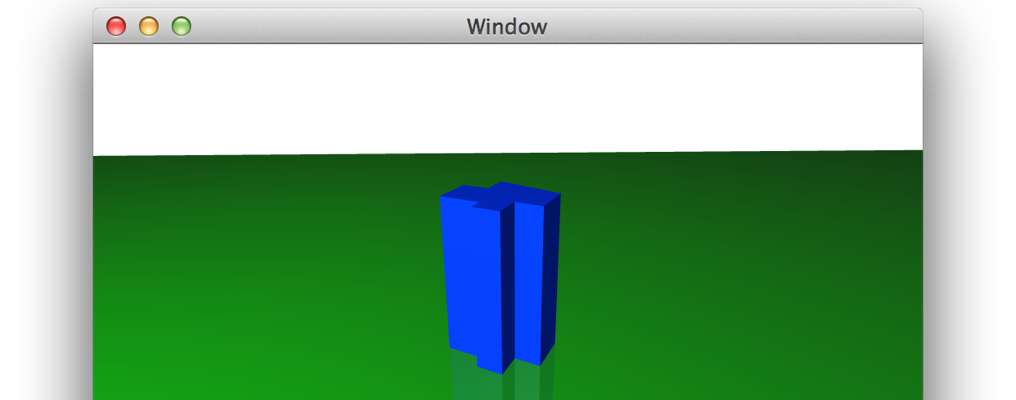
Procedural Generation of 3d content
Floorplans is a codename for my app to procedurally generate models for 3d buildings. It uses SceneKit on the mac to display models and content.
iOS 7 article series
So many new frameworks and technologies will be introduced with iOS 7 & Mavericks. Unfortunately due to the NDA developers are not able to post any in depth information yet. I’m working on a series of articles detailing my experiences with some of the new frameworks. More on that as soon as iOS 7 goes live.
]]><![CDATA[UIKonf presentation: Software interactions with the real world.]]>2013-06-10T11:10:00+02:00https://joris.kluivers.nl/blog/2013/06/10/uikonf-presentation-software-interactions-with-the-real-worldAt UIKonf I gave a talk about Bluetooth LE on iOS (and Mac). The videos for the conference are now available online. Checkout my presentation or any of the other great talks.
Liquid error: undefined method `[]’ for nil:NilClass
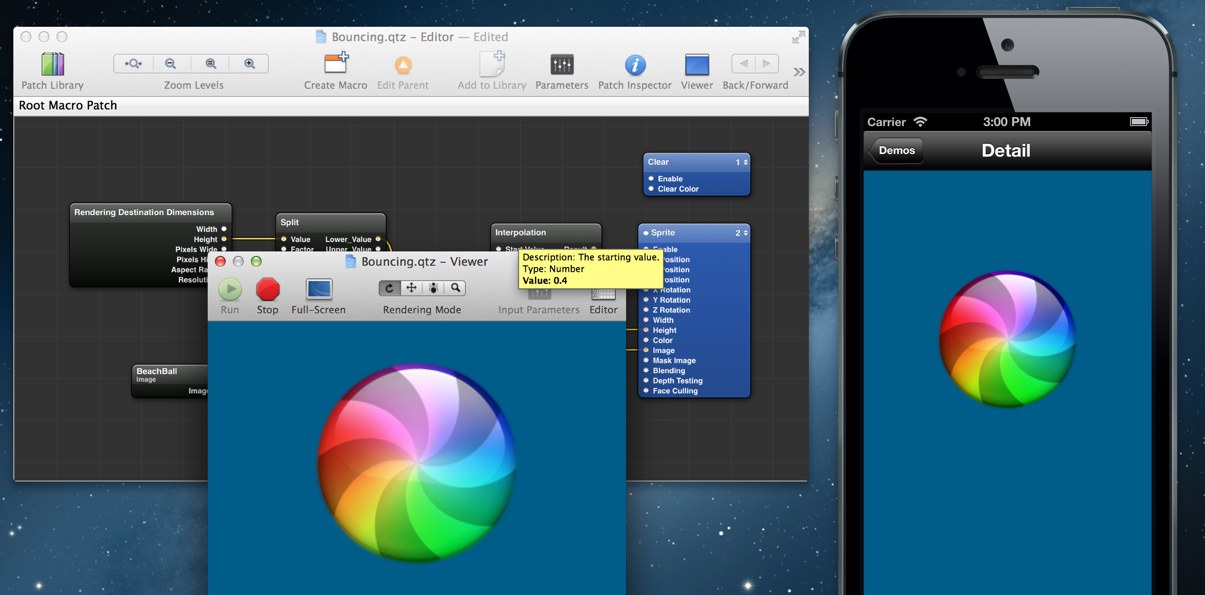
]]><![CDATA[Quartz Composer for iOS]]>2013-06-04T17:23:00+02:00https://joris.kluivers.nl/blog/2013/06/04/quartz-composer-for-iosWhile not nearly completed I decided to publish my implementation of Quartz Composer for iOS. This project intends to provide a rendering & interaction framework for .qtz on your iPhone or iPad. Similar to what the Quartz Composer framework provides on OS X.
Why?
Let me make one thing clear, I don’t see QC as a tool to create iOS applications. After some recent Facebook Home & Quartz Composer more people have taken an interest in QC for prototyping. I’ve also seen questions on how to convert these prototypes into code. This project is not an answer to that question. Prototypes in QC are just that, prototypes. Use UIKit to implement the actual app.
However I see some possible integration for QC and UIKit, like how it’s currently possible to integrate QC and Cocoa on the Mac. QC is ideal to create:
But first of all this is a side project for me to challenge myself to learn new things.
Current state
Currently only a small subset of the available patches has been implemented. This is enough to show something interesting on screen but your random composition will probably fail to render. I’m currently working to add support for more patches.
Liquid error: undefined method `[]’ for nil:NilClass
Future improvements
As already mentioned a lot of patches are still missing. This is an ongoing effort as I create more demo compositions and try to make those work.
The video also shows performance is far from optimal. Currently overall architecture and implementation is kept as naive and simple as possible. A first improvement I have planned is a rewrite of the image and texture handling, something that is currently incorrect and also the main performance hog.
Source
For the source code see qc-mobile at Github. The project also contains the demo application shown in the above video.
Do you have a composition you would like to see work on iOS, or got any comments? Any feedback is appreciated.
]]><![CDATA[Animation easing functions]]>2013-05-28T22:33:00+02:00https://joris.kluivers.nl/blog/2013/05/28/animation-easing-functionsAnimating things from A to B using linear motion is easy, but boring. Much more interesting and realistic animations are created using different easing curves. Core Animation and UIKit have nice API’s to do this, but when interpolating yourself you’ll have to resort to some math.
A quick search (goog, duck) returns a set of animation curves implemented by Jeff LaMarche. However as I found out some of those functions are incorrect. The comments for that post provide a few corrections, but not for all functions.
For this reason I implemented my own set of interpolation functions.
I decided to implement Quadratic, Cubic, Exponential and Sinusoidal easing functions. This is the same set also provided by certain Quartz Composer patches. See the interactive graph for more details on each of the individual curves.
Each of the functions returns the interpolation between start and end for the given input time (where time is between 0.0 to 1.0).
This repository also contains one Xcode project used to generate the data for the above graph.
]]><![CDATA[Require a call to super in overwritten methods]]>2013-05-23T13:59:00+02:00https://joris.kluivers.nl/blog/2013/05/23/require-a-call-to-superLearned about a useful LLVM feature recently, which I tweeted about yesterday:
TIL: Warn when required calls to super are missing: - (void) someMethod __attribute((objc_requires_super));
When overwriting your important method in a subclass you will now be warned in case you forget to call super.
123456789
@interfaceSomeSubclass : MyObject@end@implementationSomeSubclass-(void)myImportantMethod{NSLog(@"Oops, might have forgotten something");}@end
Next time you compile you’ll be presented with the following:
This has been confirmed to be available as of Xcode 4.6.1
]]><![CDATA[Code for my UIKonf demos]]>2013-05-13T12:18:00+02:00https://joris.kluivers.nl/blog/2013/05/13/code-for-my-uikonf-demosEarlier this month I was in Berlin to present at the first edition of UIKonf. This turned out to be a really well organized conference with a lot of interesting technical iOS related talks.
The video of my talk on Bluetooth Smart in iOS and Mac apps will be posted online soon. However because the demos in my talk are not easily reproduced from video I published the code for the projects online.
Quartz Composer heartrate input patch - A quartz composer plugin that connects to the first Bluetooth Smart heartrate belt found and provides the current heart rate.
Heartrate graph - Quartz Composer heartrate graph based on the above plugin.
Proximity Demo - A mac app that uses proximity detection on a published peripheral service.
The conference day was followed by UIKode, a day long hackathon at the Readmill offices. I was glad to see my talk inspired a few teams which resulted in a nice amount of Quartz Composer and Bluetooth Smart usage. My favourite project presented at the end of the day was a Bluetooth Smart based remote control for your iPhone camera.
For me the day almost resulted in failure when reverse engineering the peripheral services used in the Bluetooth Bulb turned out to be a bit harder than expected. (More on those efforts in a future post).
So eventually I gave up and decided to hack a slit-scan like video effect in Quartz Composer (thanks Niels van Hoorn & team for the idea).
]]><![CDATA[Quartz Composer]]>2013-04-26T12:24:00+02:00https://joris.kluivers.nl/blog/2013/04/26/quartz-composerThis is a call to action for anyone with the ability to file radars. My goal is to send some kind of signal indicating there are still people out there that love Quartz Composer. Which in my opinion is an amazing tool, but unfortunately didn’t receive an update since 2011.
While relatively unknown, Quartz Composer (QC) is a versatile tool that is quite big in certain niche scenes. One of which is the VJ world. And recently I was reminded again that QC is an awesome tool for UI prototyping too.
For example Mike Matas (of Apple, Push Pop, Nest and Facebook fame) is known to use the tool a lot while designing his stunning interfaces. Facebook Home was prototyped and designed using QC, after he introduced the workflow there.
It’s no secret that many of us on the Facebook Design team are avid users of QuartzComposer, a visual prototyping tool that lets you create hi-fidelity demos that look and feel like exactly what you want the end product to be. We’ve given a few talks on QC in the past, and its presence at Facebook (introduced by Mike Matas a few years back) has changed the way we design.
- Julie Zhuo @ Medium.com
To get a feel of how to start prototyping using Quartz Composer check the videos posted on Vimeo by Dave O Brien. In 11 videos he shows how you would create a dynamic interface like Facebook Home.
So to possibly direct some attention within Cupertino back to QC I’ve started filing some radars with updates I would like to see:
]]><![CDATA[Hidden shortcuts through gestures]]>2013-04-19T11:37:00+02:00https://joris.kluivers.nl/blog/2013/04/19/hidden-shortcuts-through-gesturesAs Gruber wrote last year; on iOS the highest priority is obviousness. While gestures are used more often in apps they are the opposite of obviousness. In most iOS software there is a default way of doing things using buttons. Gestures merely act as shortcuts for advanced users, and remain invisible to the regular user.
While I consider myself a power user I was pointed to two for me previously unknown shortcuts in apps I use regularly. Reason enough for a new blog post.
Mail.app drafts
For me it is the most avoided feature in Mail on mobile. Probably because it took way too much effort to remember in what mailbox the draft was stored, or to navigate there in the app.
Turns out there is a simple shortcut to reach all saved drafts from anywhere in the app using a simple gesture.
Long press the compose mail button:
This will bring up a new screen that lists all previously saved drafts. Knowing this might actually make me use drafts again.
Update: This gesture also works the same way in the official Twitter app, and in Tweetbot/Netbot.
Foursquare
A regular checkin is a multi step process:
Tap a venue name
Enter a comment & toggle social actions
Press a button again to actually check in
The last screen can become an annoyance, especially if you never use comments or social actions (like me). Luckily someone at Foursquare felt the same way. All these steps can now be skipped using a single gesture.
Long press any venue name, and wait till the timer animation (pictured below) runs out to check in immediately.
Bonus: Foursquare app is full with little easter eggs. Scroll down (a lot) on the Foursquare main screen for example:
]]><![CDATA[PARStore: A Key-Value store created with syncing in mind]]>2013-03-12T14:29:00+01:00https://joris.kluivers.nl/blog/2013/03/12/parstore-key-value-storage-created-with-syncing-in-mindLast week at NSConf 5 my colleague Charles Parnot presented a 15 minute blitz talk titled Rethinking Syncing. In this talk he details PARStore: a key value store designed to work on top of syncing mechanisms like iCloud and DropBox.
To make syncing as transparent as possible this store’s functionality is kept as limited as possible. It is definitely not a fits all solution but works well in our use-case.
Currently PARStore:
stores key-value-timestamp triplets
is an append only store
treats the newest entry for a key as the current value
Next to that each device operating on the same store only writes to it’s own database file. Locally it reads in databases from other devices and merges everything into a single timeline.
The store is currently implemented using CoreData. Each device database is added as a NSPersistentStore to the same NSPersistentStoreCoordinator. Only the database owned by the local device is added as a read-write store.
Having each device writing to it’s own database file prevents possibly destructive merge-conflicts on that file.
The source code for PARStore is available on github with a liberal BSD license attached. Feedback is appreciated.
]]><![CDATA[Airwaves: 1 month in the Mac App Store]]>2013-02-27T11:58:00+01:00https://joris.kluivers.nl/blog/2013/02/27/airwavesLast month I quietly launched my first Mac app: Airwaves (Mac App Store).
The app was created to solve a single problem: stream system audio to multiple AirPlay speakers at the same time. For an app created purely for myself it’s doing surprisingly well.
Here’s an overview of past months downloads:
While not going into the exact number of downloads, it’s certainly an interesting graph to look at. Even with a single month of data there is a pattern of peaks and drops recognizable.
The same data averaged by weekday shows a clearer picture:
On average the number of Airwaves downloads increases during the weekends. This can probably be explained by customers searching for Audio and AirPlay related apps, which happens more often when not at work.
Not sure how to explain the dramatic drop on Thursdays.
(Popularity during the weekend could just as well be a App Store wide trend, however I don’t have other Mac app sales stats to compare to. I also don’t see a similar trend in my iOS apps).
This blog has a pattern completely opposite of the graph above. Guess my readers (you) primarily visit during working hours.
]]><![CDATA[Custom view controller transitions using UIStoryboardSegue]]>2013-01-15T19:02:00+01:00https://joris.kluivers.nl/blog/2013/01/15/custom-view-controller-transitions-using-uistoryboardseguesIn this post I’ll show how to create a custom segue that animates an image to a new full screen view controller when tapped. This effect is similar to what you see when the Facebook iOS app makes a photo fullscreen.
Segues make it easy to abstract view controller transitions into reusable objects. Instead of having all the animation logic in your view controller the segue is now responsible for that. The view controller its role is reduced to configuring the segue and view controllers involved in the transition.
When done right this usually results in cleaner and more reusable code.
JKImageTransitionSegue
The custom image transition segue will animate an image from its current position to a new position in a new controller. To see what this looks like try running the source code or watch it on YouTube.
To use a custom segue, create it in your storyboard like any other segue. Set it’s type to Custom and it’s class to your custom subclass next. Optionally set an identifier.
The segue takes care of the actual animation in the - perform; method. Instead of moving the original UIImageView from one view controller to the other, a temporary UIImageView is used to fake the effect. This temporary UIImageView is added to the application window itself to stay on top of all other content. At the same time it will show the destination view controller using an ordinary modal transition, that will occur in sync with and underneath the custom image animation.
The original image is hidden as soon as the transition starts and the destination image is shown as soon as the transition ends. All together this looks like one image smoothly transitioning to another controller.
Configuration
To keep this as reusable as possible a custom segue shouldn’t need to know anything about it’s source and destination view controllers. Instead the segue can be configured before execution using - prepareForSegue:sender: in the originating controller.
The image transition uses this place to set three properties:
sourceRect - The original image rectangle
destRect - The destination image rectangle
transitionImage - The image to animate from sourceRect to destRect
These properties determine what the animation looks like without the segue having to know where to get that data from.
Unwinding custom segues
As of iOS 6 it’s also possible to unwind back to an earlier controller in your navigation path using a segue. Controllers you want to unwind to need an unwind action declared:
12
// name doesn't matter-(IBAction)unwindAction:(UIStoryboardSegue*)segue;
Next ctrl-drag from your control to exit button and to connect to one of the available actions. You’ll find the exit button as a green icon for each controller in your storyboard.
For the default push and modal segues this will use the same animation but reversed. For a custom segue no automatic reverse is provided so one of the default transitions will be used. It is also not possible to specify a custom class for an unwind segue in your storyboard.
To provide a custom segue for an unwind action you need to implement - segueForUnwindingToViewController:fromViewController:identifier: in the view controller you are unwinding to. This can be the same custom segue, or a different implementation depending on your needs.
For JKImageTransitionSegue this is also the place where the segue is provided with the right configuration, similar to prepareForSegue:sender:. In addition a custom unwinding property is used to let the segue know it should perform a reverse animation.
Demo app and source
I’ve set up a bitbucket repo to show this all in a working example.
Hopefully you’ll find this transition useful for your own app, or for inspiration when building your own transition. Some other interesting open source transitions available online:

")